Thursday, October 7, 2010

One Loaf to Love

After hearing about this meatloaf recipe from a friend, I borrowed, "Eat, Shrink & Be Merry" by Janet & Greta Podleski. This is the kind of recipe that I like to tackle and blog about. I love cooking things that are a bit out of the ordinary and taste fantastic. This recipe didn't have anything in it (except the Superburger seasoning which I had other available) that I didn't have in my cupboard regularily. It was not difficult but did take a bit of time.

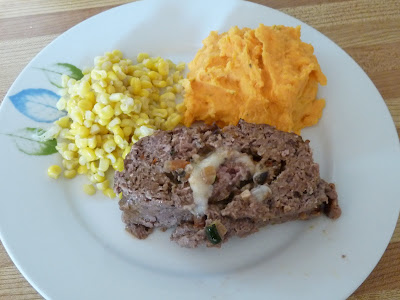
Today I've had an extra baby around the house so I made this up while two kids were sleeping and stuck it in the fridge until it was time to bake it. Hubby says that this was his favorite new "meal," implying that he enjoyed all of it :) We had mashed sweet potatoes (with Herb & Garlic cream cheese) and corn with it and it was definitely a keeper.


One Loaf to Love
1c. finely diced mushrooms
1/2c. each finely diced red bell pepper, zucchini, and onion
1tsp. minced garlic
1/4 tsp. dried basil
1 1/2 lbs. extra-lean ground beef
1c. fresh bread crumbs or 1/2c. dry unseasoned bread crumbs
1/4c. +2 tsp. barbeque sauce or ketchup
1 pkg. (25g) hamburger seasoning mix (Superburger by Clubhouse was recommended)
1 egg
1/4c. chopped fresh parsley
1/4 tsp. freshly ground black pepper
1/2 c. packed shredded light Monterey Jack, provolone, or mozzarella


Preheat oven to 375F. Spray a medium, non-stick skillet with cooking spray. Add mushrooms, red pepper, zucchini, onions and garlic. Cook and stir over medium heat until vegetables are tender, about 5 minutes. Add basil and cook 1 more minute. Remove from heat and set aside.

In a large bowl, combine ground beef, bread crumbs, 1/4c. bbq sauce, hamburger seasoning, egg, parsley, and pepper. Mix well using your hands.

On a large sheet of waxed paper, form meat mixture into a 10x12-inch rectangle. Make sure edges are nice and straight, not jagged. Spread reserved vegetable filling over meat, leaving a 1/2" border. Sprinkle with cheese. Roll up meat loaf from the shorter end, lifting the wax paper to help get it started. Roll it as tightly as possible. Pinch seam closed.

Transfer meat loaf to a broiler pan that has been sprayed with cooking spray. Bake for 40 minutes, or until meat is cooked through and a meat thermometer inserted in the centre registers 160F.

Let meatloaf stand for 5 minutes before slicing.


Makes 1 loaf, 8 slices
204 cal. per slice, 9.3g fat, 1.6g fibre

Wednesday, October 6, 2010

Loaded Baked Potato Soup

I'm really getting into the fall soups right now. It's solving my lunchtime dilemmna. I love having my husband work in town and come home for lunch every day - but along with that comes having to plan something for lunch and supper every day. Soup is the perfect solution. A bowl of soup and a bun is great for a couple of days a week.


This soup is a Kraft recipe. The entire thing is done in the microwave and it only takes 30 minutes from start to end. We used to make this soup in our microwave in my last workplace and people could never figure out what smelled so good when they came in to renew their plates or insurance ;)


I've started using this basic recipe and mixing it up by adding chicken, turkey or sausage. You could also mix up the cheeses.


Loaded "Baked Potato" Soup


1lb. baking potatoes (about 2), cubed

14oz. chicken broth (I made my own this time)

1c. milk

3 slices bacon, cooked, crumbled & divided

1c. shredded cheddar cheese, divided

1 green onion sliced, divided

1/4c. sour cream


Microwave potatoes in large microwavable bowl on HIGH for 5 min., stirring after 2.5 min. Stir in broth and milk. Microwave 10 min., stirring after 5 min. Carefully crush potatoes with potato masher.

Reserve 2 tbsp. each bacon & cheese and 1 tbsp. onions for topping. Stir remaining bacon, cheese and onions into soup.

Serve topped with reserved bacon, cheese, onions and sour cream.

Monday, October 4, 2010

Dirt & Worms Cake

Hayden had his fourth birthday last week. I love to make cakes for my kids' birthdays that they will love. This is the first kid birthday in our house that I haven't spent eight hours making the cake. This year we had lots of company and I just didn't have the time to spend on a cake. After checking out the internet for a recipe I finally decided on a "dirt & worms" cake. It was easy and so good. You could easily make this into a girl's cake by putting it in clay flower pots and topping with flowers. I doubled this recipe and it filled the truck perfectly but it was about twice as much dessert as we needed. It gave Chris & I something to eat after our runs this week ;)


1 to 1 1/4 lb. pkg. Oreo cookies
1 (8 oz.) pkg. cream cheese
1/2 cup butter, softened
1 cup powdered sugar
3 cups milk
1 (12 oz.) tub Cool Whip (can use chocolate)
2 (3 1/2 oz.) pkg. instant vanilla or chocolate pudding (I used choc. fudge pudding)
1/2 tsp. vanilla
4 gummy worms and/or other critters


Crush Oreos. Put 1/3 of the crushed Oreos into a clean dump truck. Set aside.

Mix butter, cream cheese and sugar and vanilla together. Set aside.

Combine milk and pudding mix. Fold Cool Whip into the pudding.

Fold together pudding mixture and butter-cream cheese mixture.

Layer this mixture (about 1/3 of it) onto the crumbled cookies in the truck. Next, add another layer of the pudding mixture, then another layer of cookie crumbs, continuing until all ingredients are used.

As you're layering the ingredients, decoratively place several gummy worms and critters in the "soil" so they will be seen emerging. If you have a toy (clean) garden trowel, this can also be used creatively to embellish the presentation.

Chill in refrigerator for 3 to 4 hours before serving.

Monday, September 27, 2010

Vegetarian Enchilada Bake

Photo taken from Taste of Home

Obviously, I really enjoy enchiladas since here is yet another recipe. This was a very simple, quick meal. The kids cleaned their plates up and I was told this one I could make again. I added chicken some I had some chopped, frozen chicken in the freezer but it definitely wouldn't be missed. This casserole had great flavor. I didn't have cilantro so I just left it out.

3 Servings
Prep: 20 min.
Bake: 20 min.Ingredients

1 cup shredded zucchini
1 tablespoon finely chopped sweet red pepper
1 garlic clove, minced
1 teaspoon olive oil
3/4 cup frozen corn
3/4 cup black beans, rinsed and drained
1/8 teaspoon salt
1/8 teaspoon ground cumin
3/4 cup salsa
2 tablespoons minced fresh cilantro
3 corn tortillas (6 inches)
3/4 cup shredded cheddar cheese
Sour cream, optional
Chicken (if you're family isn't for vegetarian)

Directions :
In a large skillet, saute the zucchini, pepper and garlic in oil until pepper is crisp-tender. Add the corn, beans, salt and cumin; saute 2-3 minutes longer. Stir in salsa and cilantro.
Place a tortilla in the bottom of a 1-1/2-qt. round baking dish coated with cooking spray. Spread with 2/3 cup vegetable mixture; sprinkle with 1/4 cup cheese. Repeat layers twice.
Bake, uncovered, at 350° for 20-25 minutes or until heated through and cheese is melted. Let stand for 10 minutes before serving. Serve with sour cream if desired.

Wednesday, July 28, 2010

Apple Dip

Ok...so first off, I stole this recipe from my friend, Angela...so I'll blame her for the gooey goodness.
This has to be the best way to make apple unhealthy :)

1 pkg. cream cheese
1/2 c. brown sugar
1 tub of carmel apple/fuit dip (found in the cooler near the produce)
2 skor bars chopped

Cream together the cream cheese and 1/2 c. brown sugar. Spread in the bottom of a pie plate or a 9"x9" pan. Spread the carmel dip on top of the cream cheese. Chop skor bars and sprinkle on top.

Serve with apple slices.

Thursday, July 8, 2010

Grilled Artichoke-Mushroom Pizza

Looks like I haven't done much exciting cooking lately since I haven't had a new post since May...oops!

I''m just going to link to this recipe because I tried it directly off the Taste of Home website. I'll give you my thoughts on the recipe, too!


http://www.tasteofhome.com/Recipes/Grilled-Artichoke-Mushroom-Pizza


Our family thought this was fantastic! Chris said that it is the "best weird thing that he didn't think he would like before he tried it." Hayden loved it...minus his mushroom (which I allow him to pick off as long as he doesn't complain about them). I will make some changes next time to slightly improve it.
1. I used a store-bought crust b/c I was in a hurry ... but next time I will make my own crust.
2. I would make sure and use really sweet tomatoes. I would salt and pepper the pizza before I grill it.
3. I forgot to buy olives for this recipe - I LOVE black olives but my family hates them so they were thrilled!

I've never had much luck grilling pizza but I followed the recipe and used indirect heat and it worked great! I also loved that you put the herbs on near the end and they look so good on top of the cheese.

This is worth trying artichokes for the first time in this b/c they aren't overly strong. There's a great balance btw everything

Wednesday, May 19, 2010

Watermelon Slurpees

OK...so this isn't so much a "recipe" but it sure is a summer favorite of ours. I usually find that by the time I buy a watermelon, half of it ends up going bad. I started always cubing the entire watermelon when I bring it home. The first half goes in a Tupperware container in the fridge for immediate consumption. The second half goes into a Ziploc bag in the freezer.

On a hot day like today it is so nice to have frozen watermelon ready to go.

So here it is...the "recipe."


Fill your blender about 1/2 full of chunked, frozen watermelon. Fill the blender with some type of lemon-lime soda (Sprite) so that it covers the watermelon chunks. Add a few splashes of lime juice and blend. You can add more or less Sprite to get the desired consistency. Should make two slurpees. it back and enjoy!

Tuesday, May 4, 2010

Pumpkin Chip Muffins

After coming in from a cold & rainy morning, an afternoon of baking muffins sounded like a good idea!
These muffins are a bit scary when you see how much sugar and oil is in them...but they are well worth it.
These were particularly good with a hot mug of Chai


Pumpkin Chip Muffins

4 eggs
2 c. sugar
2 c. pumpkin (16 oz. can)**
1 1/2 c. vegetable oil
3 c. flour
2 tsp. baking soda
2 tsp. baking powder
1 tsp. cinnamon
1 tsp. salt
chocolate chips

In a large bowl, beat eggs, sugar, pumpkin & oil. Combine dry ingredients in another bowl; add to pumpkin mixture and mix well. Fold in chocolate chips. Full muffin tin liners 3/4 full. Bake at 400F for 16-20 minutes.

**Note: for 14 oz. can of pumpkin add 1 egg

Tuesday, April 27, 2010

Chicken Enchilladas - New Recipe #1

I am pleased to say that the first of my experimental recipes went really well today.

I first fell in love with enchilladas after ordering them at Moxie's about five or six years ago. I right away went home and starting looking for a recipe. I've had my enchillada recipe that I've been using since then and it is always met with rave reviews. My original recipe has a cream filling but tonight's was mostly tomato and only slightly creamy.

I didn't think that my kids would be crazy about it but my three year old son told me that it was a good supper and my one year old daughter sat in her high chair and continued to eat for about half an hour. Apparently this recipe is also kid-friendly.

This recipe comes from Allrecipes.com and the only changes I made to it was to adjust the chili powder to suit my family's tastes (about 3/4 tsp.) and I used red/orange/yellow peppers instead of green since they aren't a favorite of mine. I also shredded the chicken instead of cubing it as this was mentioned in one of the reviews on this recipes.
We ate this with rice and corn and it was fantastic!

Chicken Enchilladas
(4 servings)
2 skinless, boneless chicken breast halves
1/2 onion, chopped
1/2 cup sour cream
1/2 cup shredded Cheddar cheese
1-1/2 teaspoons dried parsley
1/4 teaspoon dried oregano
1/4 teaspoon ground black pepper
1/4 teaspoon salt (optional)
1/2 (15 ounce) can tomato sauce
1/4 cup water
1-1/2 teaspoons chili powder
2 tablespoons and 2 teaspoons chopped green bell pepper
1/2 clove garlic, minced
4 (10 inch) flour tortillas
1/2 (12 ounce) jar taco sauce
1/4 cup and 2 tablespoons shredded Cheddar cheese

Directions

  1. Preheat oven to 350 degrees F (175 degrees C).
  2. In a medium, non-stick skillet over medium heat, cook chicken until no longer pink and juices run clear. Drain excess fat. Cube the chicken and return it to the skillet. Add the onion, sour cream, Cheddar cheese, parsley, oregano and ground black pepper. Heat until cheese melts. Stir in salt, tomato sauce, water, chili powder, green pepper and garlic.
  3. Roll even amounts of the mixture in the tortillas. Arrange in a 9x13 inch baking dish. Cover with taco sauce and 3/4 cup Cheddar cheese. Bake uncovered in the preheated oven 20 minutes. Cool 10 minutes before serving.
Original Recipe found at: http://allrecipes.com/Recipe/Chicken-Enchiladas-I/Detail.aspx

Experiment Menu Week

I've been using menus for my weekend meal planning for quite some time now. Probably close to five years. Although I have some great recipes, I love to find something new. This week I took a long on allrecipes.com for meals on a budget. We are a single income family and I'm always looking for something new and interesting that isn't going to break the bank. This week's menu consists of all new recipes but one. Since it's supposed to be a rainy/cold week, I've looked for a few heartier meals to keep us all warm. Here's to hoping that we're eating good this week...and hopefully find a few goodies.

Sunday, April 25, 2010

Grilled Chicken & Veggie Pizzas

We got our BBQ out from storage a few weeks ago and have enjoyed pulling out a few of our "summer" recipes. This is a favorite of ours. This is my own adapted version of a vegetarian recipe from the Better Homes & Gardens New Cookbook - Celebrating the Promise Limited Edition, pg 340. I add grilled chicken but you could easily substitute shrimp.

The day I made these pizzas we were having company for supper. I prepared the veggies and chicken earlier in the afternoon. I mixed with the mayo and pesto right before I threw them on the grill. I had this post in mind while I was preparing them but apparently I forgot to take some pictures of the finished product once the company was here. Another day I'll try and get a few pictures of the actual pizzas. I've also noticed from the pictures that I must have had some extra asparagus that day. The asparagus was a nice touch!


2 chicken breasts
1 medium zucchini, quartered lengthwise
1 small yellow summer squash, quartered lengthwise
1 small red pepper, quartered lengthwise
2 tbsp. olive oil
1 large ripe tomato, seeded and chopped
1/4 c. mayonnaise
3 tbsp. purchased basil pesto ( I use the Epicure Pesto Mix)
4 6- to 7-inch pita breads or individual pizza crusts
1 c. shredded mozzarella or smoked provolone


1. Brush zucchini, summer squash, and sweet pepper with olive oil; sprinkle with 1/4 tsp. salt and 1/8 tsp. black pepper. Grill vegetables and chicken, allowing 8-10 minutes for sweet pepper and 5-6 minutes for zucchini and summer squash. Remove vegetables and chicken from grill.


2. Chop grilled vegetables and chicken. In a medium bowl combine chopped vegetables, chicken, tomato, mayonnaise, and pesto. Spread mixture over one side of the pitas. Sprinkle with shredded cheese. Place on grill rack. Cover and grill for 2-3 minutes or until pitas are slightly toasted, vegetables are heated, and cheese melts. Carefully remove from grill. (For a gas grill, preheat grill. Reduce to medium. Cover and grill vegetables and pitas as above.)

Cantonese Chicken

OK..so I'm kind of back. I've got a computer to use for now and hopefully will have my laptop up and running this week.
This chicken recipe has been a favorite in our household lately. It's very simple and is great with rice and a veggie.
I prefer to use boneless skinless chicken thighs but any chicken works. My recipe does not indicate how much chicken to use but this is enough sauce for a family of four or five anyways.

Cantonese Chicken

1/2 c. honey
1/4 c. soya sauce
1/4 c. vinegar or lemon juice
1/4 c. ketchup
1/2 c. water
1-2 heaping tbsp. corn starch

Bring ingredients to boil. Pour over raw chicken pieces. Bake covered for 1.5 hours and 350* Uncover for last 1/2 hour. Serve over hot rice.

Wednesday, April 14, 2010

This Blog Has Not Been Forgotten...

Although three months have passed since I have last posted something on here...I have not forgot. You can say I've had technical difficulty. My laptop is sitting in the basement in about 100 pieces. To say the least, it makes it a bit difficult to use :)
We are hoping to have it up and running soon. My internet access has primarily been on my iPod since the middle of February and it is impossible to post from there. I have been taking pictures as I cook and have some good recipes to put up as soon as possible.
Don't forget about me...I hope to be back soon.

Monday, January 25, 2010

Can't Wait for BBQ Season


I've been looking through some of my favorite recipes this morning. I have realized again how much I love BBQ season and how many fantastic BBQ recipes that I have.
Only a few months to go ;)

A Greatest Weakness...

My greatest weakness this Christmas season was definitely the Toberlone fudge. I figured that I might as well throw this recipe on here while my brain was focused on Toberlone. This fudge was extremely simple to make and was absolutely heavenly!

Toberlone Fudge

1 lg. Toberlone bar (400g)
3/4 c. evaporated milk
1/2 c. butter (not margarine)
1/2 c. white sugar

Melt sugar, butter and milk over med heat. Bring to rolling boil, stirring constantly for five minutes. Remove from heat and stir in chocolate until melted. Pour into parchment lined 8x8 pan. Put in fridge to set for 3 hours.
Will not set if you substitute margarine for butter or bring to a boil too quickly.

This fudge needs to be stored in the fridge.

Craving for Cookies & Milk


Nothing like being snowed in the house to make your want to snack. I took advantage of the returned power in the afternoon to make us some chocolate chip cookies.


I've had a partial dark chocolate Toblerone bar in my cupboard since Christmas that has just been begging to be used. I'm not sure why it was still just sitting there but I decided to put it to good use. I took a simple chocolate chip recipe and substituted the chopped up Toberlone & almonds for the choc. chips. Simply amazing.


Toberlone Chocolate Chip Cookies

3/4 c. white sugar
3/4 c. brown sugar
1 c. butter
1 egg
2 1/4 c. flour
1 tsp. baking soda
1/2 tsp. salt
sliced almonds, chopped
dark chocolate Toberlone bar, chopped


Preheat oven to 375.

Mix sugars, butter, and egg in large bowl. Mix together flour, baking soda and salt in separate bowl and then gradually add to butter mixture. Dough will be stiff. Stir in nuts & chocolate.

Drop dough about 2" apart on ungreased cookie sheet.

Bake 8-10 minutes until light brown. Cool slightly on wire rack.

A Twist on Spaghetti & Meat Sauce

I get tired of the usually spaghetti & meat sauce so this is always a good change. This is among one of my easiest recipes. Last time I made this recipe, I ended up with way too much for one casserole dish so I split it into two and froze the second casserole. Will just need to go into the oven until cooked through next time I don't feel like cooking :)

Spaghetti Bake

1 pkg. spaghetti, cooked & drained
2 tbsp. butter
1c. parmesan
1 (24 oz) cottage cheese
1 lb. ground beef
1 (28 oz) jar pasta sauce
1 pkg. mozzarella cheese

Combine hot, cooked spaghetti with butter & stir until butter melts and coats spaghetti. Add 1/2 cup parmesan and stir to coat.
Arrange spaghetti in an even layer in pan. Spread cottage cheese over spaghetti and sprinkle with 1/4 cup parmesan.
Brown gound beef & drain. Add pasta sauce & heat until bubbly. Spoon over cottage cheese layer. Top with mozza cheese & remaining parmesan.
Cover with foil & bake for 30 minutes. Remove foil and bake 15 minutes. Let stand for 10 minutes before serving.

Friday, January 22, 2010

Friday Night is "Pizza Night"...

I've started a new tradition since we moved to our new house. Friday night is "Pizza Night." This week we're ordering in, once in a while it's a frozen pizza...but usually it's good 'ole homemade pizza. I've been experimenting with some new ones lately.

I'll start with the crust.

Italian Pizza Crust
Makes two

1 1/2 c. water
1 1/2 tsp. sugar
1 1/2 tsp. yeast
1 1/2 tsp. salt
6 tbsp. oil
2 1/4 c. flour
1 1/2 c. flour

Combine all the ingredients up to the first amount of flour. I switch to my dough hook on my Kitchen Aid after the first amount of flour. Add as much of the remaining flour as needed to make a soft dough that pulls away from the side of the bowl. Divide into two halves and spread out on two greased pizza pans. This dough requires no rising time.
Bake topped pizza at 400F for 20-25 minutes or until golden cheese and crust.

If you are not needing two pizzas, simple freeze one of the halves and you will have a crust for next time.

Toppings?

I have two favorites at the moment.

The first one is BBQ Ranch Chicken Pizza. I mix a chicken & rib BBQ sauce with Ranch salad dressing. I just taste it until I'm happy with the mix. I usually use one chicken breast per pizza. Cut the chicken into bite-sized pieces and brown in a frying pan. Sprinkle with salt & pepper. Other toppings include: red pepper, mushrooms, red onion, crisp bacon pieces. Top with mozza cheese & a sprinkle of parmesan.

The next one is Bacon Cheeseburger. I use pizza sauce as the base. Ground beef browned and prepared with a store bought taco seasoning (I usually freeze any leftover beef from tacos). Mushrooms, crisp bacon pieces, mushrooms, diced roma tomatoes (less seeds & less liquid). I use cheddar cheese on this pizza instead of mozza.

Sour Cream-Chocolate Cake with Peanut Butter Frosting and Chocolate-Peanut Butter Glaze

So here's the cake that I made for Chris' 32nd birthday. To say that it was fantastic is an understatement. This cake was great the day it was made but it only got better as it sat in the fridge for a few days. I actually pulled the remaining cake out of the fridge last night to get rid of it and ended up having another piece and it was still good after being in the fridge for 13 days.


This cake looks like a lot of work but it was really easy. It would have been a lot easier if I had three cake pans and could have done all my cakes at once. I had to bake two cakes, let them cool, and then bake the third cake and let it cool. I was not happy with how my cake looked. I have never worked with ganache before and I'm not sure what the problem was but my ganache was too runny. I'd love to try and make this cake again to see if I could get the ganache to work. This recipe says to put broken-up peanut brittle on top but I used chopped up mini peanut butter cups.


Everyone raved about this cake and some even said it was definitely the best cake they had ever tasted.


Sour Cream-Chocolate Cake with Peanut Butter Frosting and Chocolate-Peanut Butter Glaze
Adapted by Smitten Kitchen, only barely, from Sky High: Irresistable Triple-Layer Cakes

This cake is INTENSE. Serve it in the thinnest slices possible, and keep a glass of milk handy.

Makes an 8-inch triple-layer cake; serves 12 to 16 (the book says, I say a heck of a lot more)

2 cups all-purpose flour
2 1/2 cups sugar
3/4 cup unsweetened cocoa powder, preferably Dutch process
2 teaspoons baking soda
1 teaspoon salt
1 cup neutral vegetable oil, such as canola, soybean or vegetable blend
1 cup sour cream
1 1/2 cups water
2 tablespoons distilled white vinegar
1 teaspoon vanilla extract
2 eggs

1/2 cup coarsely chopped peanut brittle (I skipped this)

1. Preheat the oven to 350 degrees F. Butter the bottoms and sides of three 8-inch round cakepans. Line the bottom of each pan with a round of parchment or waxed paper and butter the paper.

2. Sift the flour, sugar, cocoa powder, baking soda, and salt into a large bowl. Whisk to combine them well. Add the oil and sour cream and whisk to blend. Gradually beat in the water. Blend in the vinegar and vanilla. Whisk in the eggs and beat until well blended. Scrape down the sides of the bowl and be sure the batter is well mixed. Divide among the 3 prepared cake pans.

3. Bake for 30 to 35 minutes, or until a cake tester or wooden toothpick inserted in the center comes out almost clean. Let cool in the pans for about 20 minutes. Invert onto wire racks, carefully peel off the paper liners, and let cool completely. (Deb note: These cakes are very, very soft. I found them a lot easier to work with after firming them up in the freezer for 30 minutes. They’ll defrost quickly once assembled. You’ll be glad you did this, trust me.)

4. To frost the cake, place one layer, flat side up, on a cake stand or large serving plate. Spread 2/3 cup cup of the Peanut Butter Frosting evenly over the top. Repeat with the next layer. Place the last layer on top and frost the top and sides of the cake with the remaining frosting. (Deb note 1: Making a crumb coat of frosting–a thin layer that binds the dark crumbs to the cake so they don’t show up in the final outer frosting layer–is a great idea for this cake, or any with a dark cake and lighter-colored frosting. Once you “mask” your cake, let it chill for 15 to 30 minutes until firm, then use the remainder of the frosting to create a smooth final coating. Deb note 2: Once the cake is fully frosting, it helps to chill it again and let it firm up. The cooler and more set the peanut butter frosting is, the better drip effect you’ll get from the Chocolate-Peanut Butter Glaze.)

5. To decorate with the Chocolate–Peanut Butter Glaze, put the cake plate on a large baking sheet to catch any drips. Simply pour the glaze over the top of the cake, and using an offset spatula, spread it evenly over the top just to the edges so that it runs down the sides of the cake in long drips. Refrigerate, uncovered, for at least 30 minutes to allow the glaze and frosting to set completely. Remove about 1 hour before serving. Decorate the top with chopped peanut brittle.

Peanut Butter Frosting
Makes about 5 cups

10 ounces cream cheese, at room temperature
1 stick (4 ounces) unsalted butter, at room temperature
5 cups confectioners’ sugar, sifted
2/3 cup smooth peanut butter, preferably a commercial brand (because oil doesn’t separate out)

1. In a large bowl with an electric mixer, beat the cream cheese and butter until light and fluffy. Gradually add the confectioners’ sugar 1 cup at a time, mixing thoroughly after each addition and scraping down the sides of the bowl often. Continue to beat on medium speed until light and fluffy, 3 to 4 minutes.

2. Add the peanut butter and beat until thoroughly blended.

Chocolate-Peanut Butter Glaze
Makes about 1 1/2 cups

8 ounces seimsweet chocolate, coarsely chopped
3 tablespoons smooth peanut butter
2 tablespoons light corn syrup
1/2 cup half-and-half

1. In the top of d double boiler or in a bowl set over simmering water, combine the chocolate, peanut butter, and corn syrup. Cook, whisking often, until the chocolate is melted and the mixture is smooth.

2. Remove from the heat and whisk in the half-and-half, beating until smooth. Use while still warm.

Tuesday, January 12, 2010

Spoiled Baby Back Ribs

This is one of my favorite recipes. We don't have them often as baby back ribs aren't usually in my budget when I go grocery shopping but it's always a favorite for company or special occaisions. This year we were stuck at home for New Years Eve so my parents came and spent New Years Day with us. Normally I would BBQ these ribs but I did follow the recipe and did them under the broiler and they were just as good. I absolutely love this BBQ sauce. I generally double the recipe so that we have extra sauce for dipping the ribs in. Great served with baked potatoes and a grilled veggie.

Spoiled Baby Back Ribs

3 lbs. baby back ribs, cut into serving size peices
1 cup ketchup
1/4 cup apple cider vinegar
3 tbsp Worcestershire sauce
3 tbsp. brown sugar
1/2 tsp. salt
1 tsp. liquid smoke

Directions:

1. Place ribs in a large pot and cover with water. Bring the water to a boil over high heat; reduce heat to medium and simmer until tender, about 1 hour. In the meanwhile, Stir ketchup, vinegar, Worcestershire sauce, brown sugar, salt & liquid smoke in a saucepan. Bring to a boil over medium-high heat; reduce heat to medium-low and simmer for approximately 30 minutes or until sauce has thickened.
2. Preheat oven's broiler and place rack 6 inches from heat source. Line a baking sheet with aluminum foil.
3. Drain ribs and place meaty side up on the prepared baking sheet. Brush the ribs with half the BBQ sauce. Broil in the preheated oven until sauce becomes sticky and lightly browned. Turn the ribs over and brush with the remaining sauce. Continue to broil under sauce becomes sticky, about 7 minutes.

*Recipe taken from allrecipes.com

Thursday, January 7, 2010

Where All The Magic Happens...


These really will be recipes from a humble kitchen. My dream kitchen would give me a whole lot more counterspace to work on but I guess that I cannot complain. We have recently moved into a new house and for the first time ever I have a fridge, stove and dishwasher that are from the current decade. My kitchen appliances are few (but I do love my Kitchen Aid).
The ingredients that I use are generally simple. I love to cook for my family as long as my fridge and freezer are well stocked with fresh meat, fresh vegetables and a few simple staples. I make most of my sauces from scratch and don't buy a whole lot for groceries that don't come from the produce, dairy or meat sections.
I love to sit and look through my recipe books and often look for recipes online. I would love to expand my recipe book collection as right now it does not consist of more than a few hand-me-downs and a few others.